Today, I want to talk about the best pie dough. Ever.
It is the first pie dough I ever made. It has never steered me wrong. I got a little experimental the past couple years, branching out and trying different recipes with more ingredients that supposedly make it better.
But no.
A word of advice: Simple is better.
In all aspects of life.
Thank you, Martha Stewart, for introducing me to pate brisee back when I was a freshman in high school.
All it consists of is butter, all-purpose flour (not fancy cake flour), salt, sugar, and ice water.
Easy enough?
A few things to remember when you’re making pastry dough:
1. Keep your ingredients COLD. Don’t go crazy and freeze your ingredients and equipment, but make sure that after you cube your butter you stick it back in the fridge to firm up. It’s important for a nice flaky crust that won’t fall apart!
2. I’m just going to say it, and some won’t agree — don’t use a food processor. I’ve used it before, and the crust turned out tough and chewy. I’m sure it can be done with great finesse (I’m talking to you, Martha) but it’s not the same. And maybe it’s just because my favorite part of making pie is making the crust by hand. It’s a truly calming experience. Even when it doesn’t turn out perfectly, it’s all about the love that you’re putting into it. Nobody cares what it looks like, they just want to eat it!
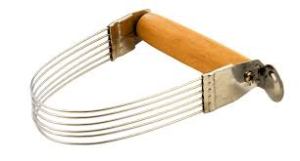
So how do you make it by hand? With a pastry cutter.
It works by cutting the cold butter into the dry ingredients and blending them into a coarse mixture.
This, and only this, is the reason I have biceps. Most notably, a right bicep.
So if you missed a workout, make pie dough. Problem solver right here!
Back on track. After you cut the ingredients together, leaving pea-sized chunks, add your ice water one tablespoon at a time. Switch to a wooden spoon at this point, because you don’t want to break up any more butter.
3. And now, feel the dough. Be the dough. You are the dough. (Miss Congeniality quote there, sorry.) It should still look pretty dry, but hold together when you squeeze it. I went for a long time adding water until it looked like a perfectly uniform ball of dough. It was harder to roll out and wasn’t flaky. Don’t over-mix it once you reach the right consistency.
4. As far as chilling, I used to wrap the flat discs in plastic wrap, but it was extremely irritating trying to rip a piece off the roll with my floury, sticky hands. Now I use plastic sandwich bags. Life saver. Gather half the dough and gently press it together, forming a ball. Pop it into the bag and press down, forming about a 1/2 inch thick disk. I try to press together the cracked edges so it is easier to roll out. Make it look as uniform as possible. Chill the two disks for, say, 30 minutes. An hour would be nice, too.
5. Here comes the scary part for most of us – rolling out the dough. One remark I must make:
YOU ARE IN CONTROL. DO NOT LET THE DOUGH BE THE BOSS OF YOU. YOU ARE A COMPETENT HUMAN BEING.
Seriously, stand up straight, get the rolling pin in your hand, toss some flour on the board and go at it! Just DO it. If you act like you’re scared, the dough will sense it and it just won’t work.
Work quickly so it doesn’t warm up too much.
Lightly flour everything – the board, the rolling pin, the top of the dough, maybe even your cheeks if you want to really get into it.
Starting in the middle, roll away from you, then turn counterclockwise about 45 degrees, not back and forth. It’ll shrink if you do that. Constantly move it, rotate it, whatever you have to do. If the edges crack, patch it up with some water and extra dough. No big deal! I usually roll it until I can place my pie plate upside down over it and there is about 2 inches of extra dough around the sides.
Now using the rolling pin, transfer it to the pie plate by rolling the dough around it and unroll it into the pie plate. Don’t stretch the dough. Gently press the inside, making sure the dough is touching the plate. Now trim the edges with scissors or a knife, leaving about a 1 inch overhang. Tuck the edges underneath so that it is even with the edge of the plate. Now you can crimp using your fingers, a fork, a spoon, or just leave it plain. Let it chill in the fridge until you fill it. Or you can freeze them for up to one month. Just let them thaw in the fridge before you use them.
And there you have it! Pie dough made easy.
One more trick for you. I’m on a roll.
You’ll probably have a bit of leftover dough, but don’t throw it away! Roll it back out and cut into 1 inch strips, then place on a baking sheet. Sprinkle with cinnamon sugar and bake at about 400 degrees (or whatever temp your pie is baking at) until golden brown, about 5-10 minutes.
They are absolutely incredible. It really highlights the simplicity of the buttery, FLAKY crust and will hold you over until you can slice into the pie!
I hope these tips have encouraged you to try making your own pie dough or perfecting your own recipe. Most importantly, have fun while doing it!
Happy dough-making!
